Left-Right View
Call Flow Designer
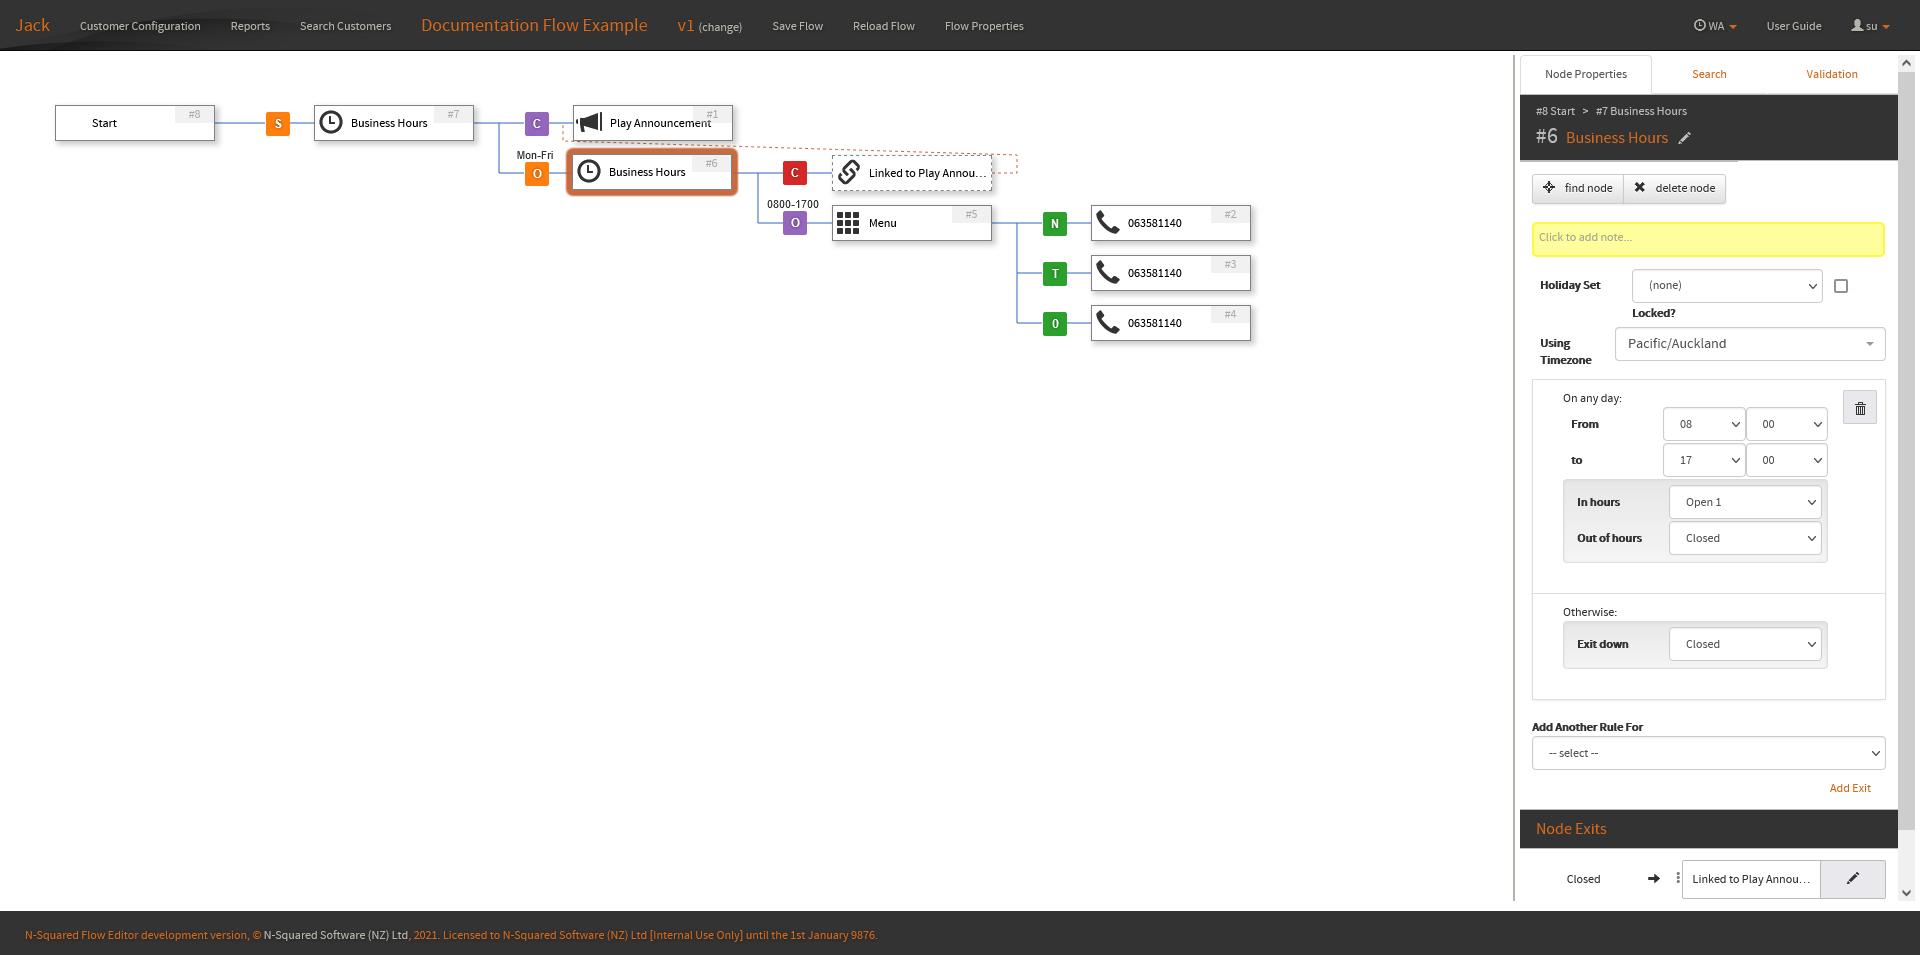
The flow designer is a graphical interface for designing control flows for service numbers. Starting with the “Start” node in the top-left of the canvas, the designer shows the call control logic that will be applied to any calls that execute this flow (after the associated freephone number is dialled)

All node property editing is performed in the properties display shown in the right panel. When beginning a new flow, the flow will present a Start node.
Moving Around
To move around a flow, click and drag the canvas by clicking on any part of the white background where the flow appears, and (while holding the mouse button down), drag the mouse in the direction you want the flow to move.
You can also centre a node in the canvas by clicking on the node. The title bar is the area of the node which displays the node’s name and node number.
To recenter on the selected node, press Control + h;
You may follow a branch of a node by clicking on the node exit. The node exits are shown on the right of each node, with a node exit name (exit names depend on the node type and are often context specific).
Movement keys.
You are also able to move around the flow with the arrow keys.
| Key | Movement |
|---|---|
| Up Arrow | Move to the next node above that shares the same parent with the current node. |
| Right Arrow | Move to the first child of the current node (if the node has children). |
| Down Arrow | Move to the next node below that shares the same parent with the current node. |
| Left Arrow | Move to the current node’s parent node. |
Adding New Exits
Some nodes have the ability to add additional exits to the node, the method of adding an exit may change from node to node.
After selecting a target node, press Control + e to add a new exit to the end of the current exits. The node must support adding a new exit.
To remove the last exit, press Control + Shift + e while selected the target node. The last exit will only be removed if that exit is empty.
Flow Versions
When viewing a flow in the flow designer you may also change the version of the control flow you are viewing
by selecting the change button located next to the flow version in the title bar of the flow designer.
The Flow Version option allows you to select the version of the control flow to view or edit:

All versions of a control flow are displayed unless they have a build status. Versions with errors
will be displayed in the list with an error tag.
Saving Flows
A node may be saved by clicking the Save Flow button in the title bar, or by pressing Control + s.
When saving, the server performs validation checks on the flow configuration. If any issues arise from the validation the issues will be shown in the Validation Tab in the Sidebar.
When saving, you may choose to save the flow with a new name, or (if relevant), keep the existing name.
Flow names cannot end with the reserved suffix for emergency flows. By default
this is _alt, however it is configurable per-installation.
If an alternative flow is being created you will be unable to adjust the name of the flow.
Saving will be prevented if there are any validation errors
Node Anatomy
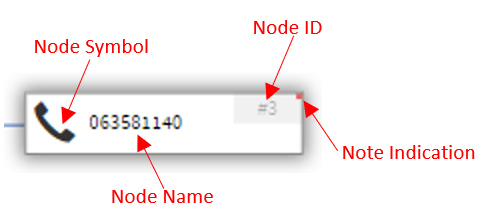
Compact Flow nodes consist of 4 sections
- Node Symbol, this is an icon that is used to represent the node.
- Node Name, this is the name of the node. The name can be changed in the Sidebar.
- Node ID, the unique number (within the flow) representing the node.
- Note Indicator, an indicator used to show when a node has a note attached.
- Hovering your mouse over the Node ID will show the node’s note in a small dialog.
Sidebar Anatomy
The Sidebar is the main way of interacting with nodes.

Node Properties
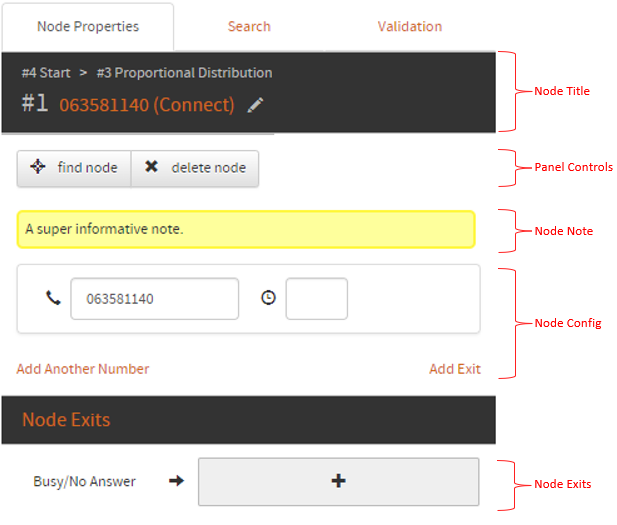
The Node Properties shows the information related to the currently selected node.
There are 5 sections in the node properties.
- Node Title
- The top half of the Node Title is the breadcrumb for the current node.
- The breadcrumb shows the path from the Start node to the currently selected node.
- Clicking on any node in the breadcrumb will center on the clicked node.
- The bottom half of the Node Title is the currently selected node’s ID and name.
- The name can be changes by clicking the pencil to the right of the name.
- If the node has a custom name, the node’s default name will appear in brackets next to the custom name.
- The top half of the Node Title is the breadcrumb for the current node.
- Panel Controls
- Find Node
- Clicking Find Node will center the flow on the currently selected node.
- Delete Node
- Clicking Delete Node will give you the option to delete the node.
- Find Node
- Node Note
- The node note is a text area for adding any information you wish to the currently selected node.
- If the node’s note has any text in the text area, there will be a little dot on the node to show the note has text. See Node Anatomy.
- Node Config
- This section shows the configuration options related to the currently selected node.
- Each node has different configuration options, see the node’s page for information on configuration options.
- Node Exits
Adding Nodes
To add a new node to the selected node, click the ‘+’ button next to the desired node exit.
In addition, with the target node selected, press Control + g to open the add node dialog and select the first exit as the node
exit to add a node to.

Upon clicking the + button or pressing Control + g, the add node dialog will appear with the available nodes, grouped by
the node’s Node Category.
Clicking the desired node will add the node to the flow.
The following keybinds allow the target exit to be changed.
| Key | Functionality |
|---|---|
| Control + Up | Will change the target exit to the exit above the current target. |
| Control + Down | Will change the target exit to the exit below the current target. |
Modifying the Exit Node
To modify an exit node, click the pencil icon next to the desired exit node.

Clicking the pencil icon will bring up the same add node dialog used in the Adding Nodes section.
Once a node is selected, the new node will be placed in-between the selected node and the existing exit node.
If the node being added has more than one exit, a dialog will appear asking you to select which exit the existing node should be added to.

If the new node or the existing node is a Link Node, the existing node will instead be replaced.
Deleting Nodes
To delete a node do one of the following while having the target node selected:
- Press the Delete Node button on the sidebar.
- Press the
deletekey.
If the node has nodes connected to at least one exit, a deletion confirmation dialog will appear.
The deletion confirmation dialog give you the option to either cascade the deletion to all node exits, or replace the node being removed with one of the node’s exit nodes.

Add Node Dialog

The add node dialog is the dialog used to select the node you want to add to the flow.
Pressing the arrow keys will select a node type within the Add Node Dialog in the direction of the key.
Clicking any node type, or pressing enter when with a node type selected will add a new node of that type to the selected exit.
To help in quickly creating large flows, modifier keys may be held down while selecting a new node:
| Key | Functionality |
|---|---|
| (no key) | Close the add node dialog and remain on the current node. |
Control |
Close the add node dialog and focus on the newly-created node. |
Shift |
If the current node has empty exits remaining, keeps the add node dialog open. Selecting another node will add that node to the next empty exit of the current node. |
Control + Shift |
Focuses on the newly-created node and keeps the add node dialog open to allow another node to be added to the first exit of the new node. |
Search
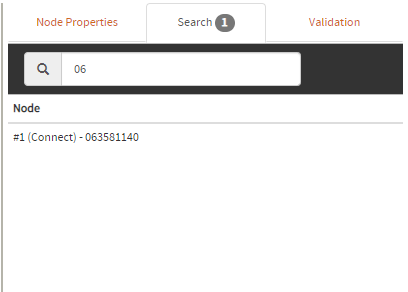
The search tab is useful to quickly find specific nodes. Entering text into the search bar and pressing enter will display a list of node matching the given search term.
The search term will be checked for matches against:
- The node’s ID.
- The node’s display name.
- The node’s name.
You can switch to the search tab at any time by pressing Control + f
| Key Combination | Functionality |
|---|---|
| Ctrl + Up Arrow | Highlights the previous node within the results. |
| Ctrl + Down Arrow | Highlights the next node within the results. |
Validation
A flow may be in a state where it may not be saved due to missing or invalid configuration. For example, removing the final ‘0’ from the Connect node in the Node Properties section will cause an issue.
When attempting to save a flow, the user interface will perform local validation on the flow, ensuring that all basic validation requires pass. The total number of issues will show on the sidebar tab.
Validation can be run at any time by pressing Control + b.
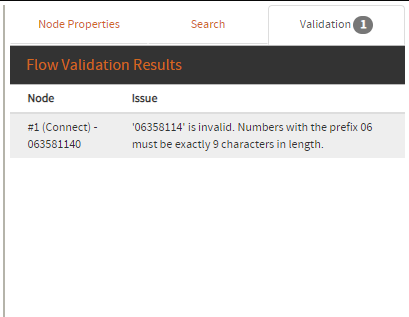
Any validation errors should be resolved before attempting to save the flow again. The solution to the error will depend on the issue. If the fix is not clear, consult the errored node’s documentation for further information on the node’s requirements.
To quickly get to the errored node, simply click the issue and the node in question will be selected and focused.
Key Combinations
The flow editor has a list fo key combinations that can be used to do basic functions of the flow.
Flow
When on the flow screen, the arrow keys can be used for navigation. (See Movement keys)
| Key Combination | Functionality |
|---|---|
| Ctrl + h | Re-centers on the current node. |
| Ctrl + s | Save the flow. |
| Ctrl + f | Switch to the search tab. |
Add Node Dialog.
When the add node dialog is open, pressing the arrow keys will move a selection around the dialog.
When the desired node type is highlighted, enter can be pressed to create a new node that is the same type as the one highlighted.
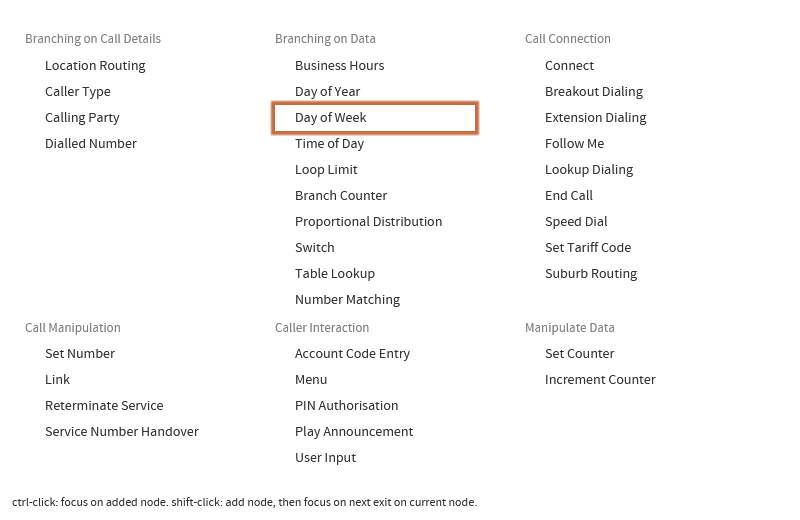
Holding Ctrl when pressing enter will focus on the newly created node.
Holding Shift when pressing enter will add the desired node then focus on the next empty exit on the current node.
Holding Ctrl + Shift when pressing enter will add a new node, focus on the new node, and focus on the first empty exit on the new node.
Sidebar Keys.
There are several sidebar specific key combinations.
| Key Combination | Functionality | Comment |
|---|---|---|
| Ctrl + Up Arrow | Highlights the previous exit within the side bar | Highlighting the exit is required to create a new node using the key combination. The exit will also be updated when inside the add node dialog, the current exit can be checked by looking at the add node dialog header. |
| Ctrl + Down Arrow | Highlights the next exit within the side bar | Highlighting the exit is required to create a new node using the key combination. The exit will also be updated when inside the add node dialog, the current exit can be checked by looking at the add node dialog header. |
| Ctrl + g | Opens the add node dialog for the currently highlighted exit. | Defaults to the first exit of the current node. |
| Ctrl + d | Deletes the current node. | A confirmation dialog will open up if the node has child nodes. |
| Ctrl + e | If the current node can have more exits, add an exit | |
| Ctrl + Shift + e | If the last exit can be removed, remove the last exit | Requires the last exit to not be connected to another node. |